Creating a website that targets college students to work together on projects with other students that are in their University or outside of their University. Aimed to network, receive payment, get experience, and build portfolio-worthy work.
For the tools used for this case study, I primarily used Adobe XD to create the mid and hi-fidelity of how the website would look on the server. I also used Adobe Illustrator to create the icons and Xmind to help me build the information architecture and site map.
We, as a team, built a functional website that answered any problems and challenges we faced as a team. We created a platform to help students like me work with others to network and build a portfolio and experience that can help them find a job in that field.
One of the biggest challenges we faced as a team was figuring out the right and most beneficial way for students to get behind this platform that can help them succeed with their goals and compete with others. It was a big hurdle that we eventually were able to figure out.
My role in this project was to design the layout and functionality of the website. Creating an experience for the user that works on the website by creating an information architecture, site map, wireframes, designing icons, and establishing the final layout design.
This project began in August 2022, when I worked and collaborated with my team to work on the idea, design, and structure. It would last until April 2023, when we built a functional website targeting our primary audience.
Looking through the market, we noticed various platforms resonating with what project connect wants to accomplish. We found an abundance of choices that can compete alongside Project Connect. But one of the key differences is that we are pushing to aim toward students either going to college for the first time or getting back into the groove. We also wanted to make this platform a way of helping students get compensated and the experience required for potential job offers. Project Connect is what we want to push and make a difference amongst our competitors and shape up not only our target audience but also the stakeholders. We, as a team, moved to create user interviews and surveys to understand what is needed to build a robust website against other juggernauts in the market. After evaluating who is both the target audience and stakeholders, we wanted to compare the pros and cons of our competitors and make a criterion table that would help us create a vital website that aligns with both our audience and stakeholders' goals.
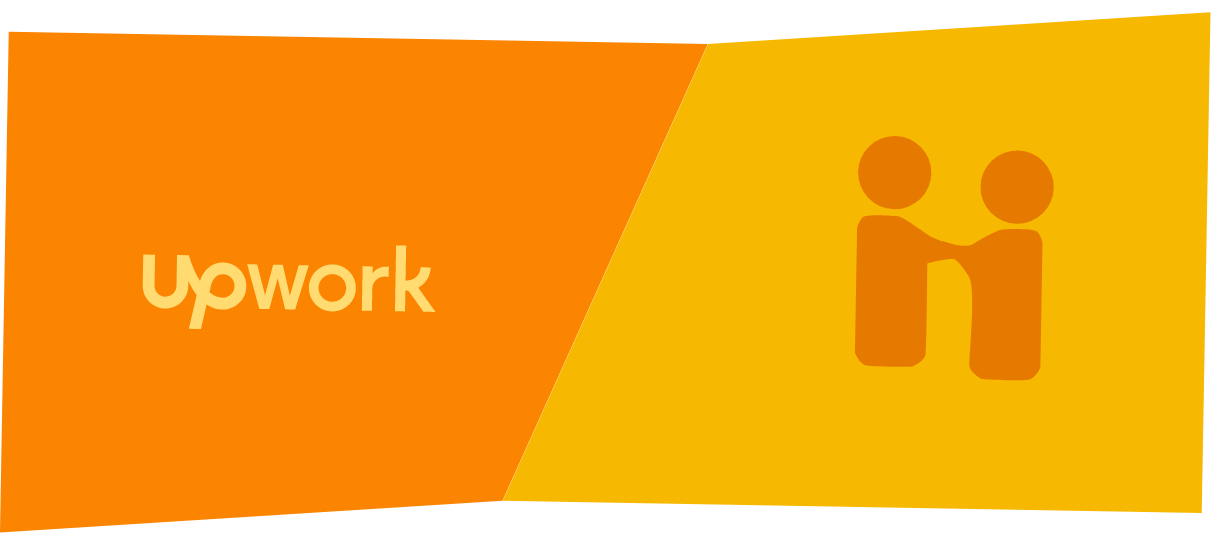
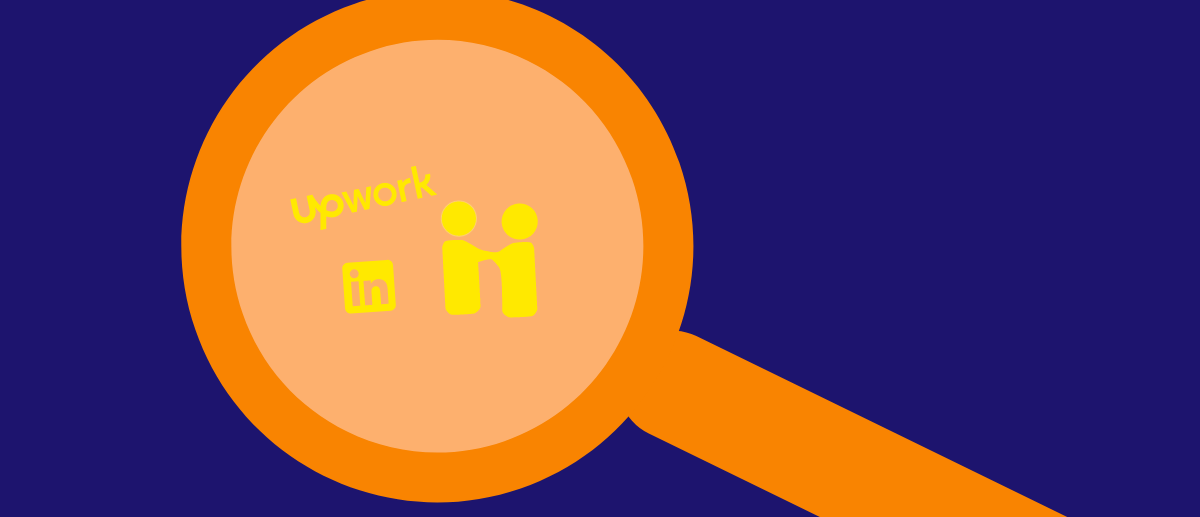
We found numerous great websites that rivaled Project Connect and are useful and usable apps. But we decided to trim off and focus on two great websites that would compete against Project Connect. The two primary competitors in the market were Upwork, a freelancing service for professionals. The other competitor is Handshake, a platform aimed at helping college students find work or internships in their field of study. Both platforms worked seriously, and each had a purpose that helped their target groups. Project Connect aims to be freelancing designed for college students, helping them build a portfolio to show potential clients. Project Connect has a similar idea that makes them competitors in our market. Our goal was to distinguish what made Upwork and Handshake work so well and find the other aspects that could have worked better to build a website that allowed students to work together and help each other with a particular part of that project. I created the pros and cons of each Upwork and Handshake, telling you what worked and what didn't.

Once I gathered more information on both competitors using the pros and cons list, I made a criterion table that helped us evaluate what each website had that worked and what were some things that were missing. If the website contained content we wanted to add, we put down a one, and if it did not have that content, I would put down a zero. I would add everything up into a percentage of that row. After creating my criterion table, Upwork contained content we wanted to add, like users getting paid, history of work, and payment method. For Handshake, It had Events for students and see user profiles. Both included users finding jobs, reviews, and portfolios. Making this table helped mold what to create inside the website that needed to be added or worked from both competitors.

One of our bigger target audience are students who have just graduated from high school and will enter college or a university in their first year. This group will range from 18 years primarily to students going to college for the first time over 18 years old. This audience is a focus group that we wanted to shift our attention to when creating Project Connect.

This target group is students who have already passed their general studies and have moved into focusing on one of the leading six roles Project Connect provides. This student would be our primary audience group, as they have figured out what they will major in and can use this platform to grow their portfolio in hopes of a job or as a side gig until they get their degree.

This focus group is for older students who are getting back to college. This group can range from adults in their mid-20s to late 30s who want to get back into college after an extended break. Project Connect helps build a platform that can cater to this group and build a solid portfolio to expand on their resume.
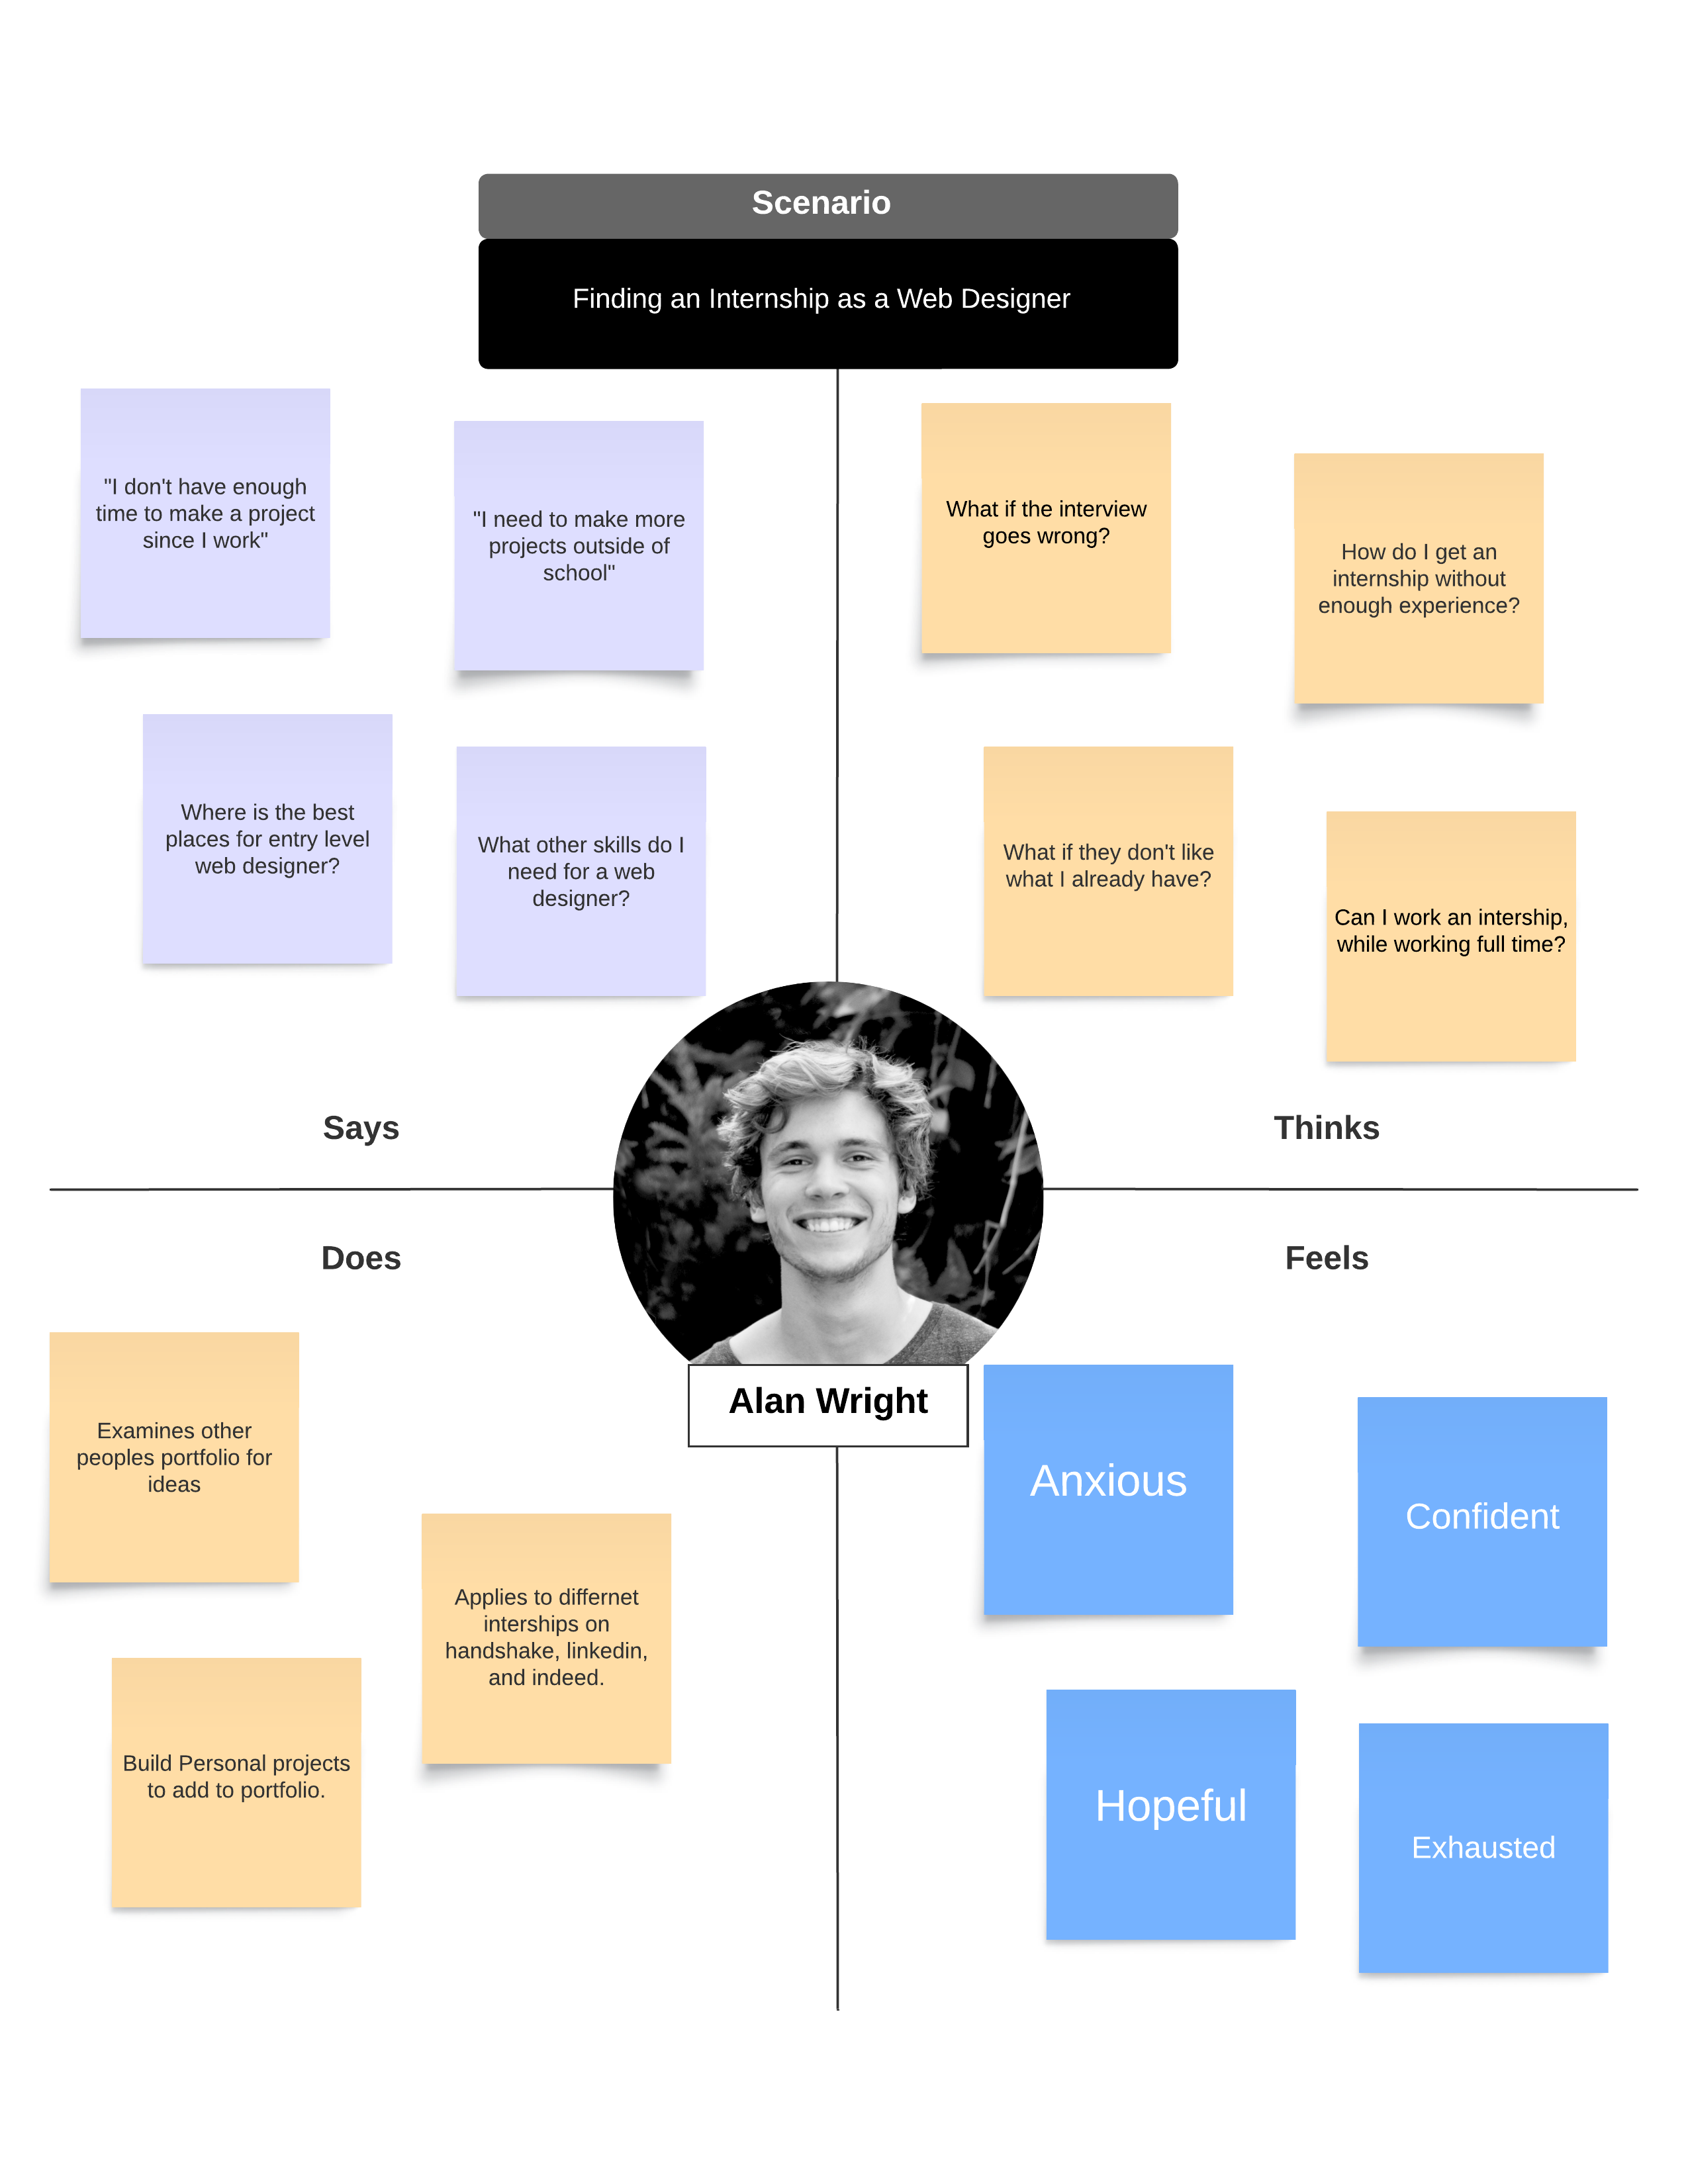
I created an empathy map that will help me better understand a use; Alan Wright is majoring in web design and just recently completed his general course to move on, focusing on his upper-level classes in his field. Alan wants to find an internship but only has two projects so far. Alan knows he will add more as time goes on in his University, but he still wants to find an internship in his field. The only thing with Alan is that he lives with his roommates and needs to pay his portion of the bills, so he has to work full-time to do that. Alan only knows a few people and classifies himself as introverted. Alan does not have time but is still looking for an internship that can be paid and cut down his hours at work. This empathy map showcases that there can be guys like Alan who are going to college and have to work full-time and may need to be more extroverted to network with people. What if we can build towards people like Alan that can network with others without needing to speak with them in person and find projects that he can work at the comfort of his own home and get paid while doing it? That's an example of a user benefitting from Project Connect.


While I have created the user profile, I want to design a SWOT Analysis that will help me understand the business aspect of Project Connect, like Strengths, Weaknesses, Opportunities, and Threats. Making the SWOT Analysis will help me diagnose realistic problems that can face Project Connect and also excellent reasons why it will function.

I begin constructing now that I've created an identity of who Project Connect is for. I first start making the information architecture, which helps me break down what will go inside each website page and their relationship with one another. I started creating the landing section: About Us, login, sign up, be inspired, and the landing page where the user will land, learn more about Project Connect, and decide whether to sign up. Once the user signs up with their email, phone number, and password, it will lead to creating a profile page, which is one-page regarding important information regarding the student. As the student completes the profile, they will be asked a question (which they can skip) about their goals using Project Connect. As they pick their choice, the student will be taken to the Connect page, where the user can see the feeds of other students, list their projects, or help others with them. The user can navigate to messages to send messages to other students and receive notifications regarding reviews, projects, goals, and more. The user will also see different rankings of the leading six roles with their sub-sections and list a project they need help with. Students can also view their profiles and see all the information they input earlier. If you want to see the complete information architecture, click here.
Now that I have completed the information architecture, I move on to the next phase, making the site map of all the pages for Project Connect. I had in total of over 30 Pages and with many including tabs that will provide different content like the settings, rankings, and be inspired page, to name a few. At the bottom is the site map and where everything would lead. If you want to see the complete site map, click here
I wanted to check how the website would look by figuring out the layout structure and evaluating how to make the design responsive for all screen sizes. I always make sure to create four different screen sizes that match each breakpoint for:
I made sure that each design fits those breakpoints. Next, I created 16 column grids for each page to help me lay out each section and breakpoint containing the max width of 1200px.
Once I have everything I need, I now create the layout I want to use for Project Connect. For the wireframes, I begin with a monochromatic outline that highlights how it will work. As the user enters http:*/www.projectconnect.com, they will be directed to the landing page, which elaborates on what we do, how it works, and inspiration on what students can do here. The max width for the website is 1200px, and each div section is spaced out 243px for the landing page. As the user scrolls down, they will learn more about the roles and expertise we focus on. Specifically for lists, row gaps will be 12px apart, and column gaps will be around 55-60px. For grids, column gaps will be 211 px, and row gaps will be 75 px.
This is the general layout I had for the website regarding grids and divs if I were to explain it to a developer. The user can click the button of that role and be taken to the be inspired page of that section group. They will see more about that section and what sub-sections they provide and seek inspiration from the user. On the be inspired page, they will see six different tabs that the user can click and see other students' work and learn more about it if they click the image or name. The user can also see the about us, log in, and sign up pages. This mainly was the design for this section; now I will move onto after the user signs up, which is the connect page.
The footer will be constant for ALL pages. Before they sign up and after, the footer will be in unison and have the same links to them. We, as a team, broke down the footer into five columns, the logo, about, terms and policies, helpful resources, & social media. Each section will have links underneath that will take them to another page.
Before we get to the main page, The user must create their profile first, inputting personal information like name, college, area of study, projects, and more. Once the user completes their profile page with the required information, they will be asked a question that will help us know the main goal as to why users want to use the project to connect and collect that data to improve upon those features and expand that goal for users. Once the user does that, they will finally get to the main page.
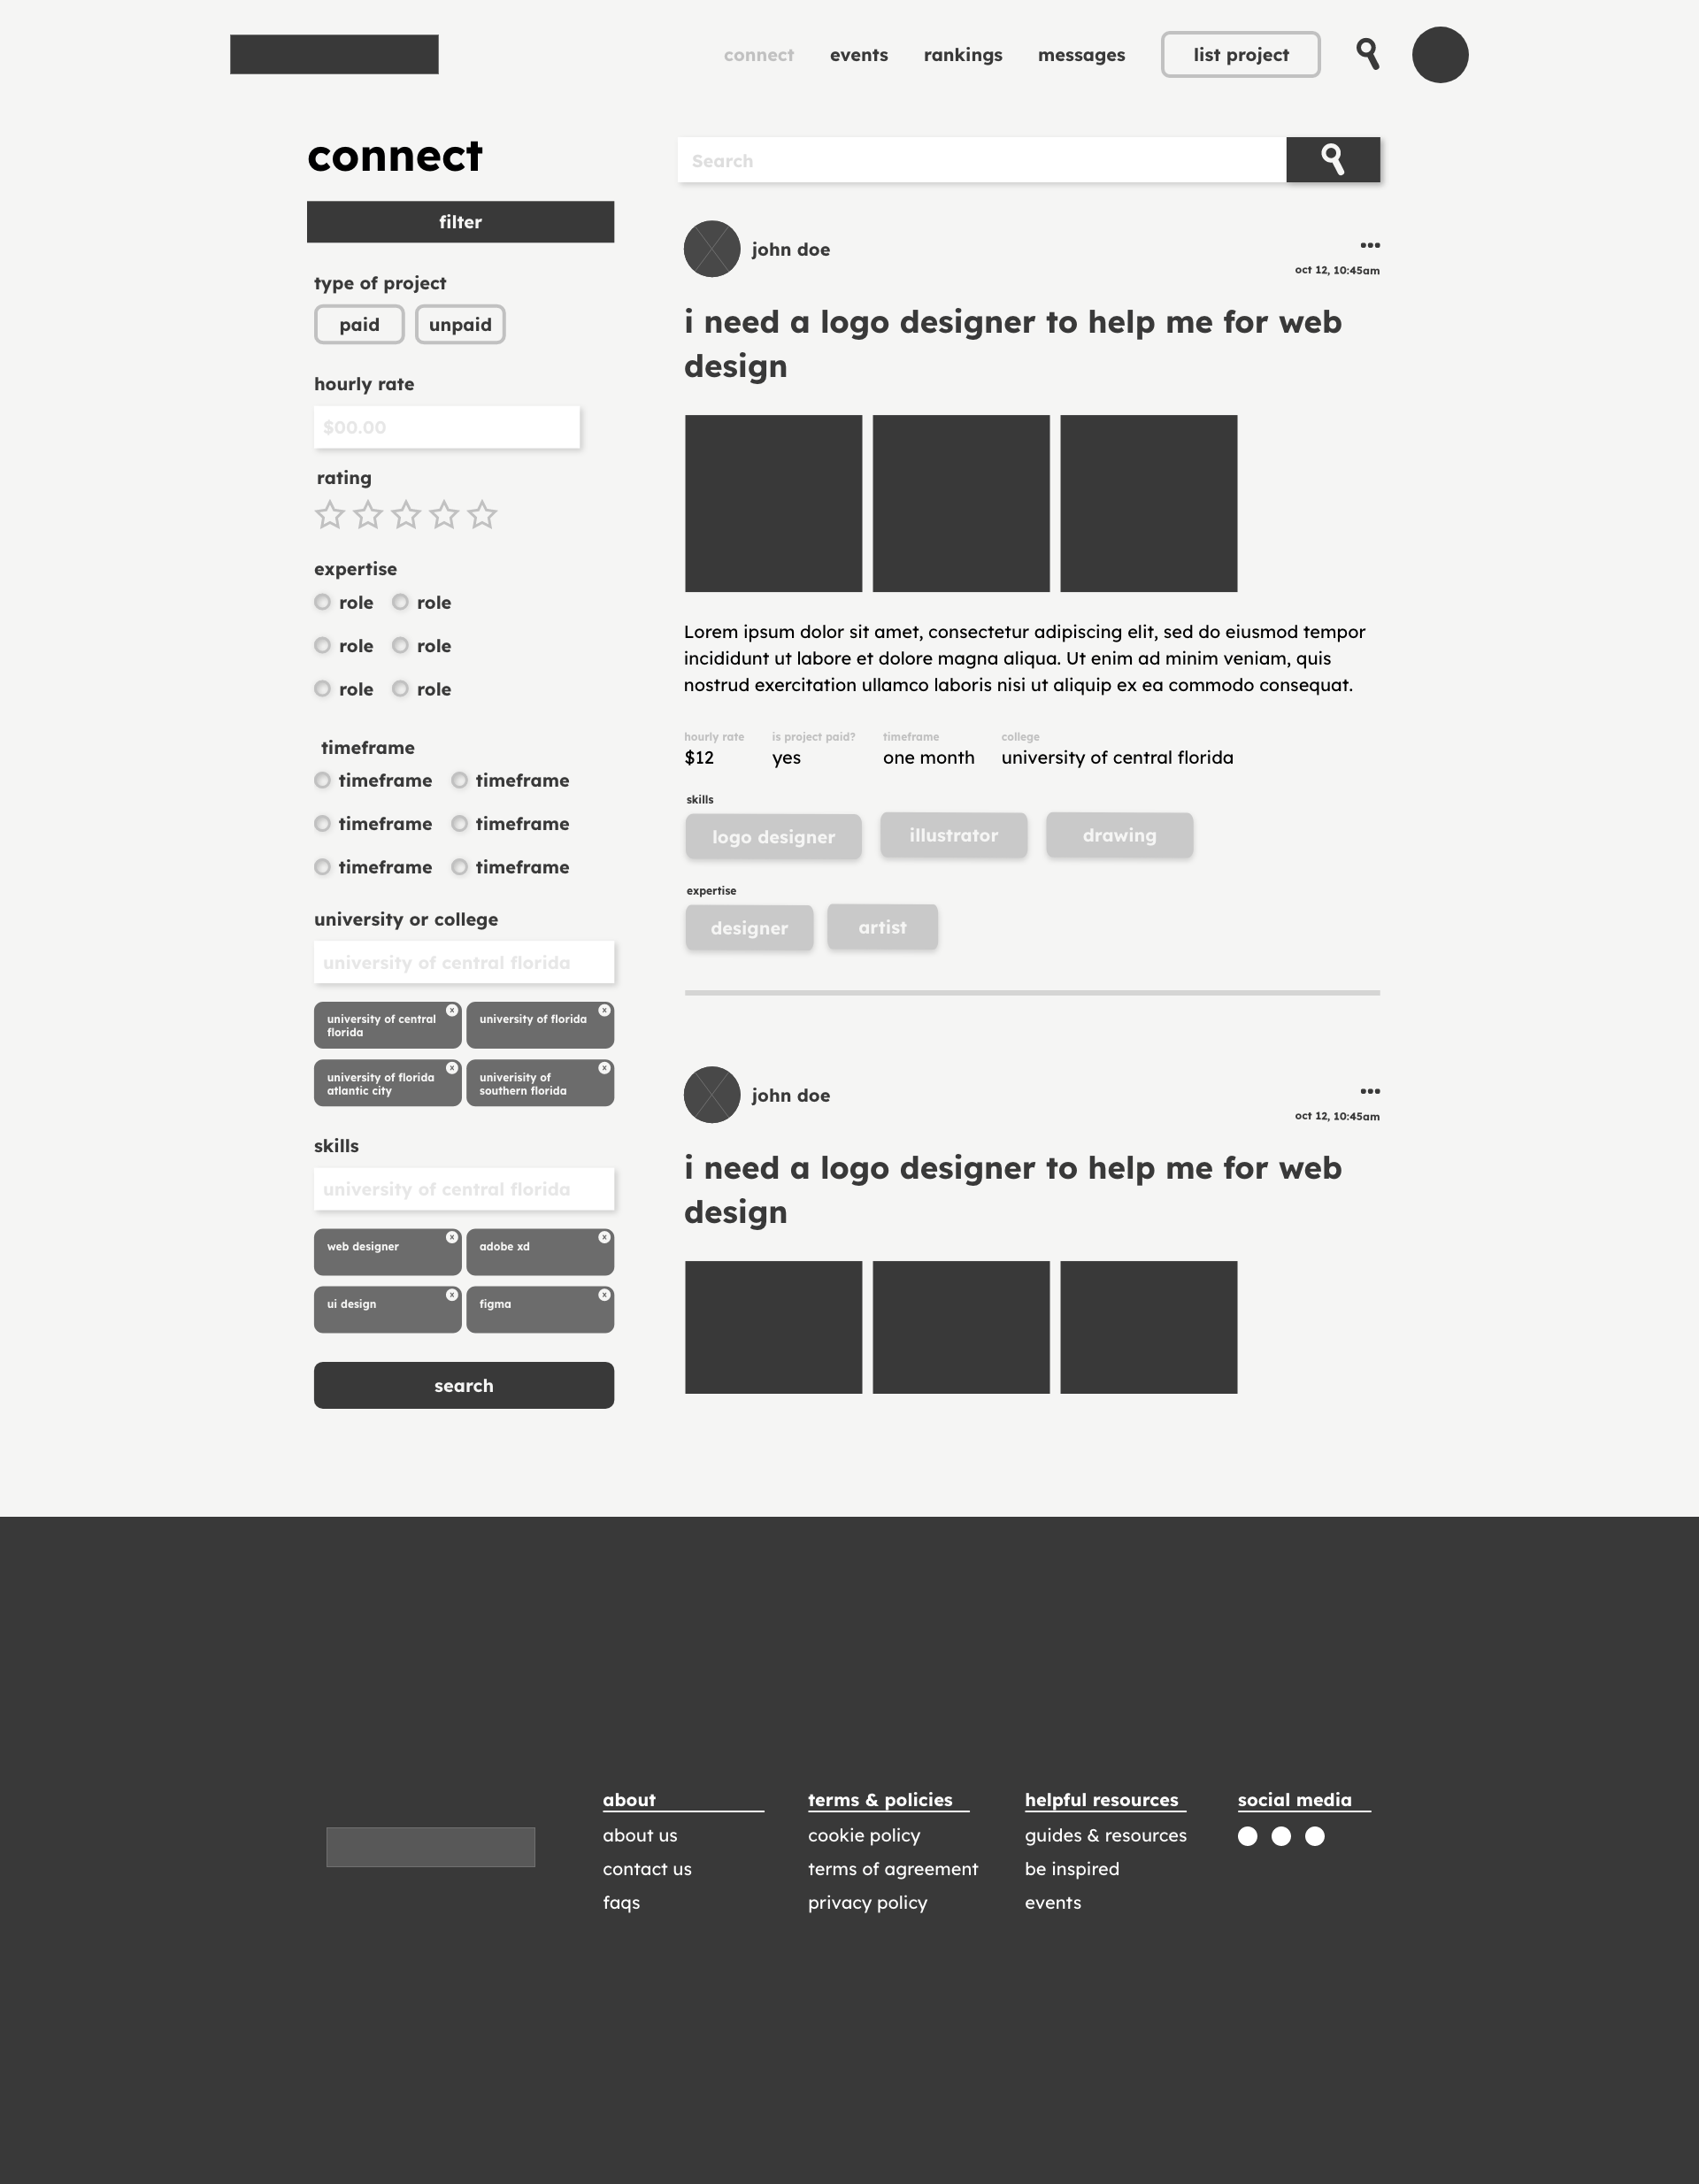
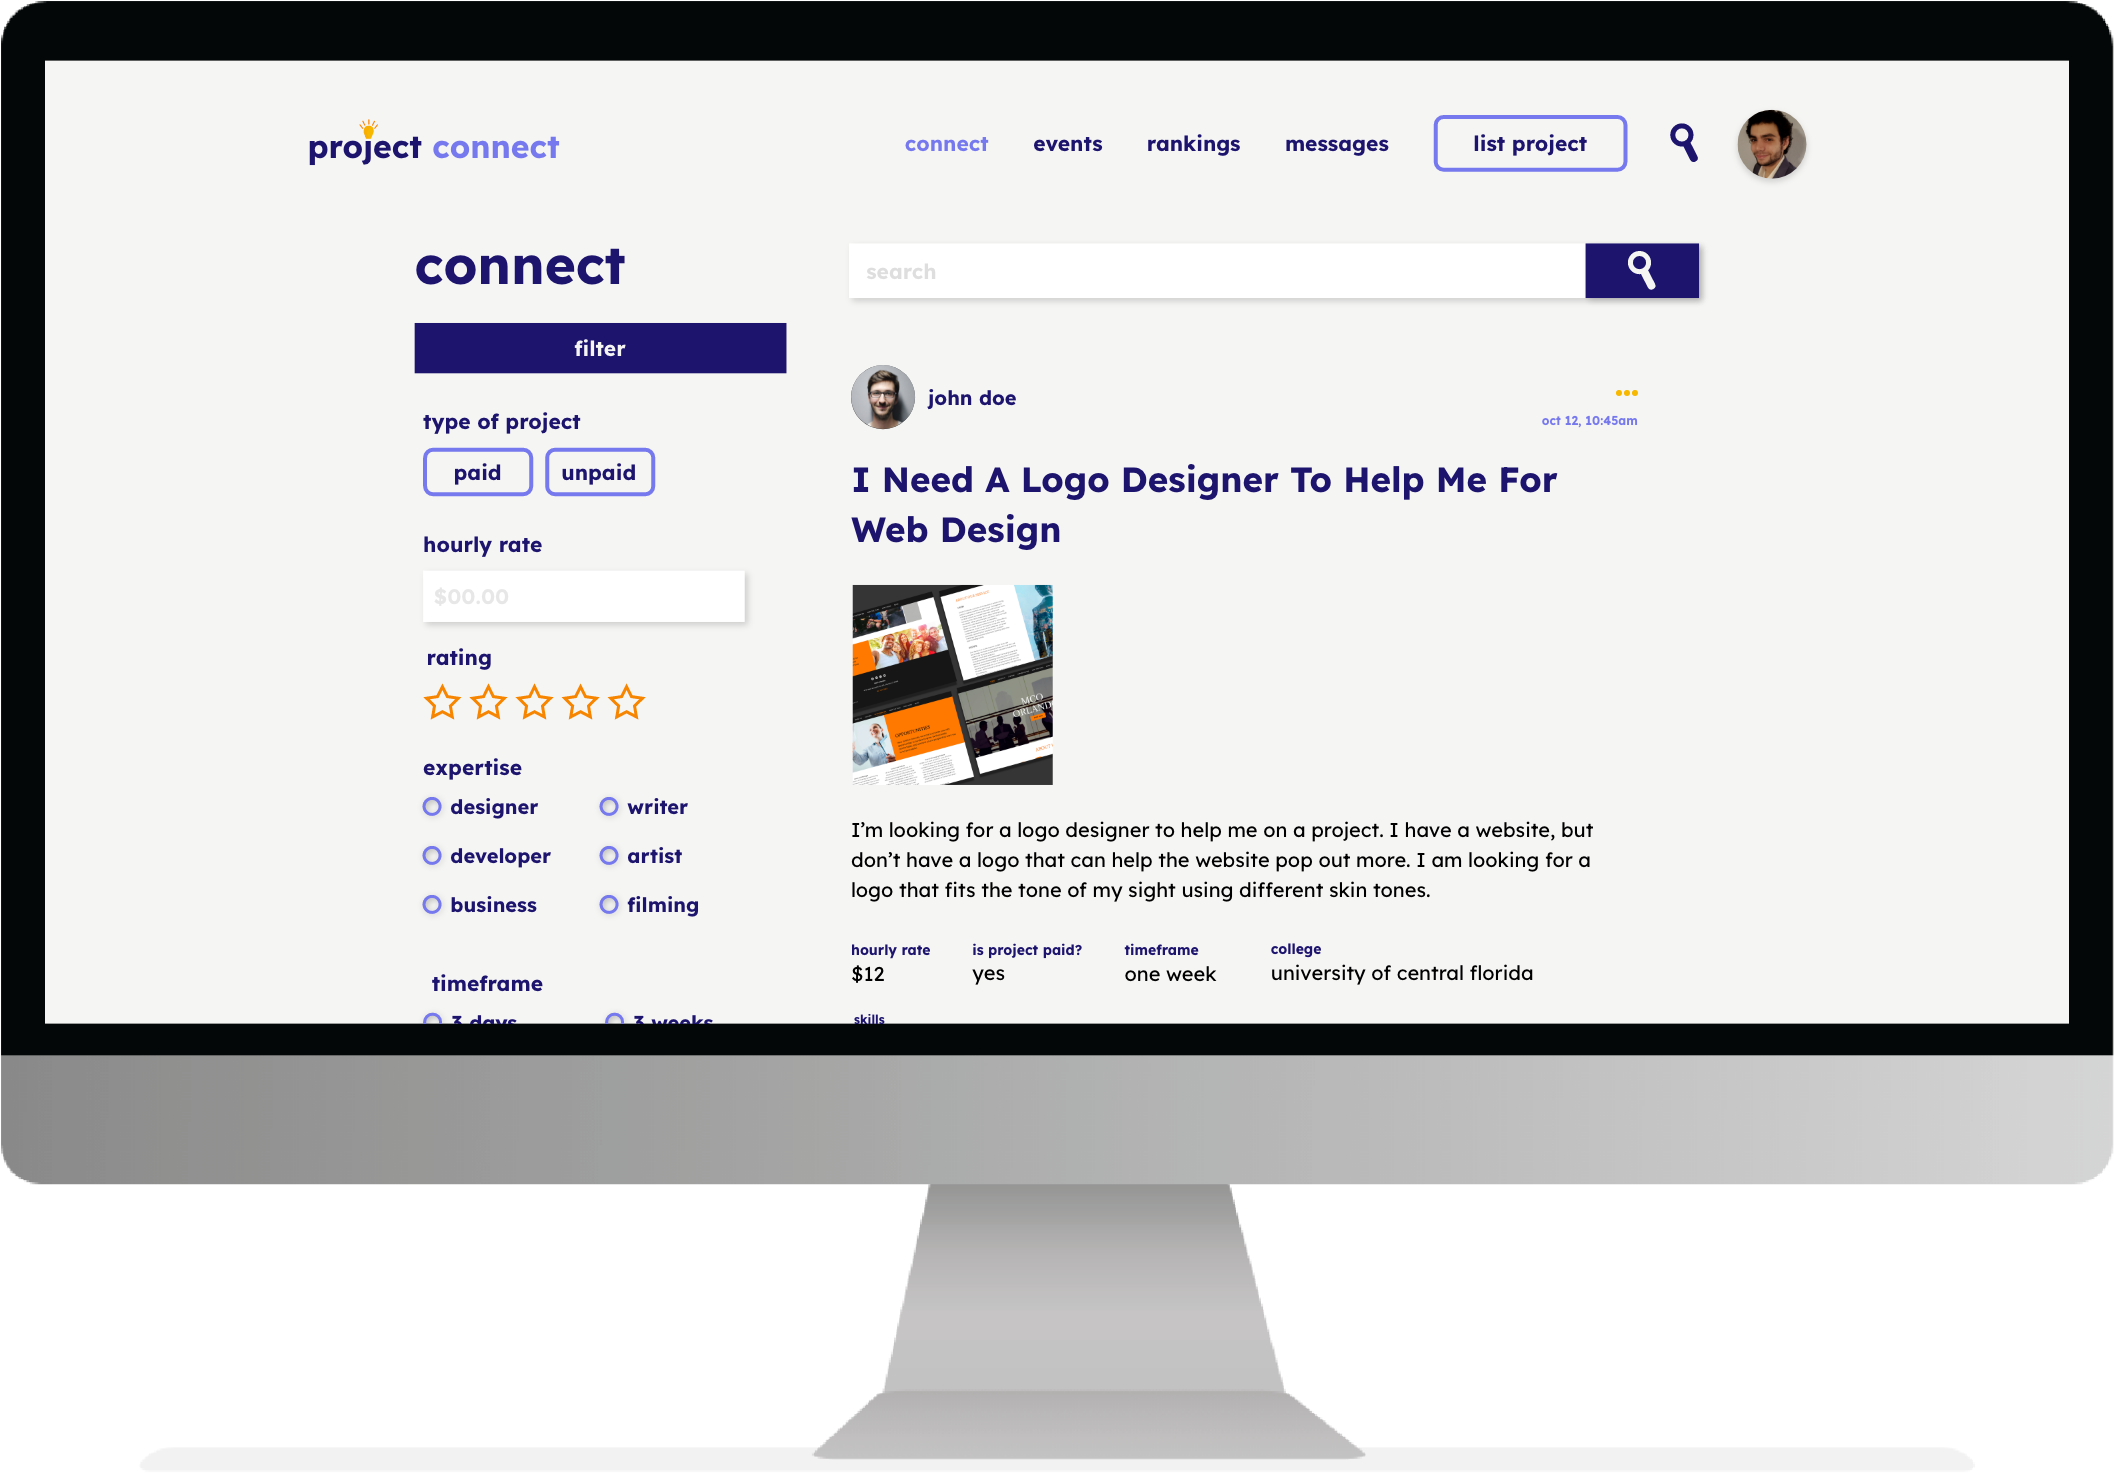
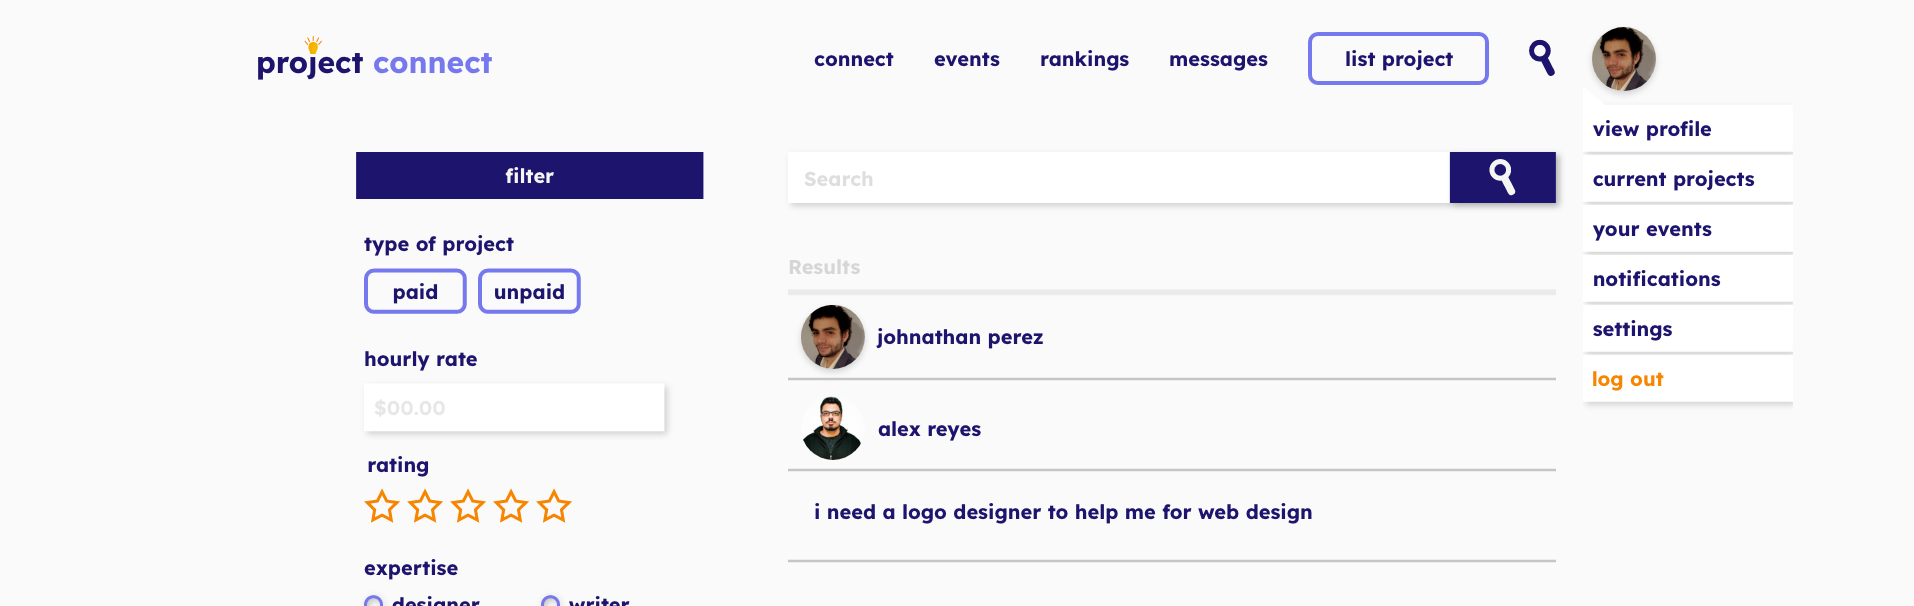
You have finally made it to the connect page, where all students can assist students or even list a project for help. Users will see a filter on the left and see what criteria they are looking for in a project. The user can also scroll down and see projects based on their role or do a search on a specific project. If the user selects "list project" they can create a project based on their needs. Inside the website, the user can send messages, view rankings, and create or join an event. These are the main content of project connect that can help students find projects they can work on, paid or unpaid, and even list projects—now moving to the user profile.
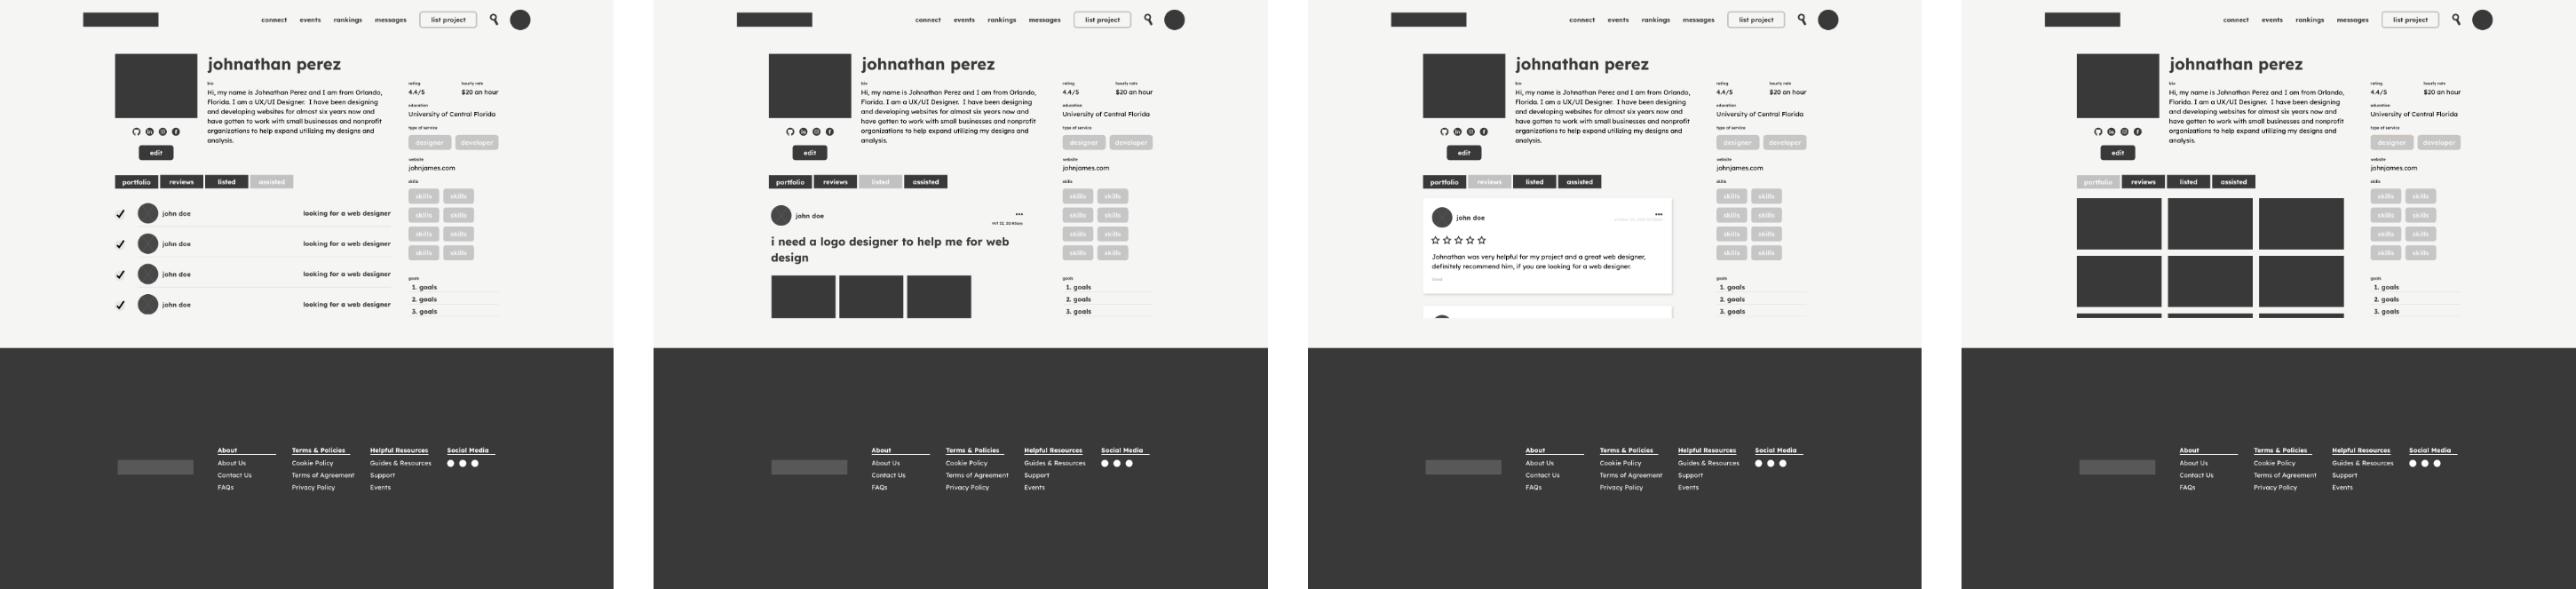
Inside the user profile, the user will press the profile picture, a circle on the top right of their screen, and they will see a few different options. The first is the notifications, where users are notified of certain things, such as projects, goals, and reviews. The user can also see the events they joined and current projects they chose to assist with and decided to work on. The user can also log out and receive a pop-up. If they are sure they want to log out and do, they will go back to the landing page. Now to see the user dashboard, the user will press view profile. In the view profile, the student will go to their user dashboard to break down their portfolio, reviews, listed projects, and assisted projects. The profile page will also include previous information the user input before entering the connect page.


 #1D146E
 #7678ED
 #F5F5F4
 #FB8500
 #F7B801
 #F9AF01
The font we decided to go with was called Lexend, which was because it fit the tone we were chasing after. Which was fun but also can get down to business. The sizes of the fonts varied, but we broke them down into

I wanted to identify keywords that optimize SEO for project connect so that Project Connect will come up ahead in the pool of choices the user searches up. For this process, it was easy to identify the keywords to use, but I also used other websites like WordStream to help me remember more keywords I may have missed. I broke it down into four categories related to Project Connect and collected all the keywords to input into the website.

After gathering the layout and flow of project connect, now I put the colors, images, and text onto the pages. As the user lands on the page, they will see a darker tone of white as the background and use midnight blue as our dominant color with a touch of medium state blue, lemon, and mango. inside the landing page will have five different links in the navigation that includes the logo(home), about, be inspired, login, and sign up. Each page will contain different content that would help the student get an idea of who project connect is and ideas for students to create a project the user enters the website they can sign up inputting their personal, college, skills, and project maker information in the form, they will be asked a question regarding their goal and then have a welcome page to land sign into the connect page.
Inside the connect page the user can see the filter section on the left and feed on the right of different projects students can assist with. The user will also be able to send messages and see events, and rankings of current students. The user can also press "list project" for assistance. The user can also search by clicking the search icon next to the profile image. The profile image includes a dropdown that includes:

For the profile page, you can see different project work the student has done underneath the portfolio tab and can add a review of a student in the reviews tab. The user will also be signified of the students they listed which will be a lemon color and assisted is a mango color in the reviews tab. For the assisted tab, the user will see a midnight blue checkmark with a lemon background signifying the user helped out that student with their project, and an X with a mango background signifying the user was not selected to assist in the project. If the user decides to log out, a pop will appear asking if they are sure they want to log out, and if they are, they click the logout button and take them back to the landing page. If you want to see the entire hi-fi prototype, Click Here.
Now with the hi-fidelity completed, I conducted user testing on the hi-fidelity designs to examine the pros and cons of Project Connect. I tested the website out on a 24-year-old who is majoring in software development and see what she thought about the website. I asked her what were the pros and cons of the prototype and she listed the:
This helped me gain an idea of what me and my team needed to get done for maintenance and fixing those issues in the future. The testing is completed and now I am going to track down what that user does in each step by creating a user flow.
With the user flow, I tracked down everything the user did from beginning to end and see what were some of the pages that she went through.
Me and my team did a great job learning how to create the right product for that user. I was able to research the market and competitors that project connect would compete against and get an understanding of what goes on in the market. I identified the target audience by creating user profiles of the type of users that can use project connect. Once I evaluated the users I created the wireframing and mapping of how the website would work. I designed the mid-fidelity prototype and hi-fidelity as well. Then as a team identified the colors and font we wanted to use for the website. The logo was created by myself and used for the favicon as well. Overall this was fun and knowledgeable to learn and go through the motions of a case study.